The Four Secret Gas Stove Repair Tips I Learned the Hard Way
Basic gas stove repair tips and tricks to save time and money — 4 hard-earned tips for making safe, effective home repairs to common problems.
There’s nothing quite as frustrating as walking to the kitchen, turning your gas-stove knob and hearing that click, click, click — but no fire.
Or worse, the burner lights, but it burns unevenly, or orange instead of blue, or keeps going out by itself.
I’ve been there. Multiple times.
I made every mistake in the book before I learned what you’re going to learn. I called repairmen for things I could have fixed in 10 minutes. I swapped parts that were no doubt not broken. And once — I’m not proud of this — I took a small gas stove problem and turned it into something so much worse simply by not knowing what I was doing.
Here’s everything you need to know about gas stove repair basics — the stuff no one teaches you. These are tricks I learned through trial and error, frustration — and eventually success.
Whether your burner won’t light, the flame looks funny, or your stove is making weird noises — read on. This guide explains everything in plain, straightforward language.
Where Most People Go Wrong With Gas Stove Repairs From the Get-Go
Before diving into the four tips, let’s discuss the most common mistake homeowners make.
They skip the diagnosis step.
They see a problem, and they just start changing parts or calling the cavalry without diagnosing what’s actually going on. There are five different causes for a burner that won’t light. If you base your choices on the wrong information, you waste money and time.
The second mistake? Ignoring safety.
Gas stoves require — it should go without saying — gas. That means even minor fixes require a safety-first mentality. You don’t have to be afraid of your stove, but you do have to respect it.
Now, let’s break down the four secrets.
Secret Tip #1 — 80% of All Lighting Problems Are Caused by Dirty Burner Caps
The biggest facepalm moment of mine.
The first time a burner wouldn’t light, I thought it was a faulty igniter. I watched videos, read forums, and was prepared to order a new part. Then a neighbour — who had been in appliance repair for 20 years — came over and looked at my stove for maybe 30 seconds.
He picked up the burner cap, pointed to the clogged ports around the edge and said, “Clean this first.”
It worked. Instantly.
How a Burner Cap Works and Why It Matters
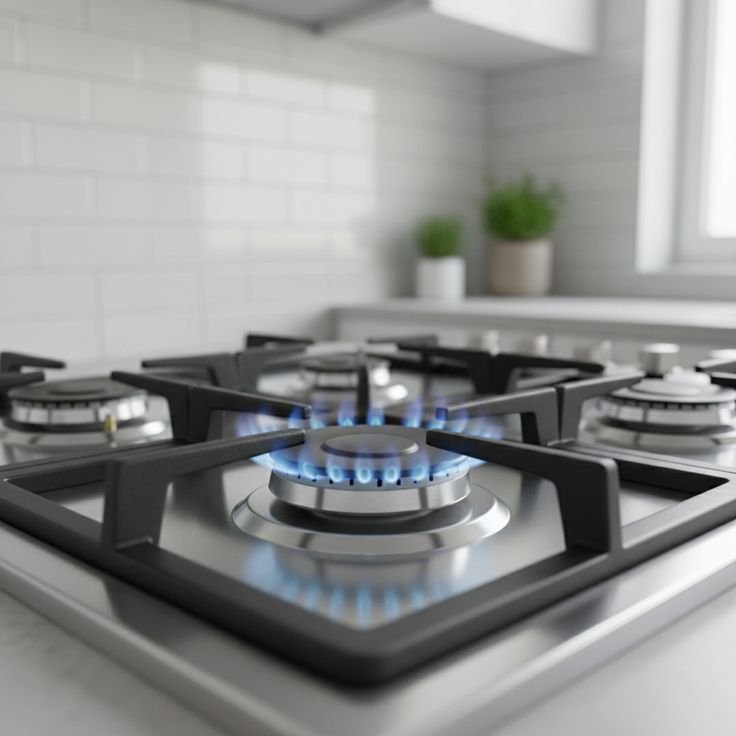
The burner cap sits above the burner base. It has small slots or holes around the edge, known as ports. Gas travels through these ports and combines with air to produce a smooth, uniform flame.
When food, grease, or boiled-over liquid enter those ports, gas cannot flow correctly. You get:
- Uneven flame
- Weak or no flame on one side
- Repeated clicking without ignition
- Flame that goes out mid-cook
How to Properly Clean Burner Caps
Most people just wash off the cap and declare it done. That’s not enough.
Here’s the proper method:
- Allow the stove to cool all the way down before touching anything.
- Remove the burner grate and lift off the burner cap.
- Inspect the ports closely — you’re bound to see brown or black buildup.
- Let the cap soak in warm, soapy water for 20 minutes or so.
- Use a toothpick or thin needle to poke through each clogged port.
- Gently scrub with an old toothbrush.
- Rinse, then dry thoroughly — and this is important: do not replace a wet burner cap on the stove.
- Reassemble and test.
There is a surprisingly common reason ignition fails: a wet burner cap. Water clogs the gas ports just as grease does.
Dirty vs. Faulty: How to Tell the Difference
| Symptom | Dirty Burner Cap | Faulty Igniter |
|---|---|---|
| Clicking but no flame | Very likely | Possible |
| Uneven or weak flame | Very likely | Unlikely |
| No clicking sound at all | Unlikely | Very likely |
| Flame lights but goes out | Possible | Unlikely |
| Yellow/orange flame | Likely | Unlikely |
Always start with the burner cap. It’s free and it solves the issue most of the time.
Secret Tip #2 — The Igniter Spark Module Isn’t Always the Problem (Even if It Absolutely Looks Like It Is)
After my burner cap lesson, I thought I knew gas stoves. Then I encountered a new problem: one of my burners was clicking by itself, even when I wasn’t using it.
I suspected a defective igniter spark module. That’s what most online guides cite.
But the actual cause? Moisture.
Why Your Stove Might Be Clicking on Its Own
If your stove keeps clicking while you stand back from the knobs, it usually comes down to one of these three things:
- Moisture on or around the igniter — from spills, steam, or recent cleaning
- Burnt dust or food particles on the igniter tip
- A defective igniter switch (this is rare, but can occur)
That little white ceramic nub you see next to each burner is the igniter. It’s what creates the spark. If anything moist or oily sits on it, you’ll get random clicking or weak, erratic sparks.
How to Clean and Dry Your Igniters
This is the step very few people ever think to take:
- Remove the burner grates and caps.
- Examine each igniter tip — the ceramic component that protrudes above the burner.
- Gently brush off any debris with a dry toothbrush.
- Use a can of compressed air to blow out any moisture sitting around the igniter base.
- You can also use a hair dryer on low heat from about 6 inches away for 30–60 seconds.
- Wait 10–15 minutes, then try the stove.
This has solved the random clicking issue for me twice now.
When Is the Igniter Actually the Problem?
If cleaning and drying doesn’t solve the problem, the igniter may simply be worn out. Symptoms of a genuinely defective igniter include:
- No spark whatsoever (and the cap is clean)
- Pale orange light instead of bright blue-white
- Clicking that sounds weak or irregular
Replacing an igniter is a reasonable DIY job for most people, but it involves pulling the stove out and working near gas connections. If that makes you uneasy, calling a technician is the smart move.
Secret Tip #3 — A Yellow or Orange Flame Is a Warning, Not Just an Annoyance
I used to think a yellow flame was just something that happened sometimes. I didn’t think much of it.
Then I learned what it really meant — and I took it seriously.
Blue vs. Yellow: What Your Flame Colour Means
A healthy gas stove flame is blue, with possibly a small yellow tip at its very centre. The blue colour means the gas is burning efficiently and completely.
If the flame turns yellow or orange, it means the gas is not burning properly — there isn’t sufficient oxygen mixing with the gas.
This matters for two main reasons:
Reason 1 — Efficiency: A yellow flame burns more gas and yields less heat. Your cooking suffers, and your gas bill increases.
Reason 2 — Carbon Monoxide: Incomplete combustion can create carbon monoxide (CO) — a colourless, odourless gas that is very dangerous. A touch of yellow flame isn’t an emergency, but a steady orange flame is an immediate fix-it situation. For a deeper understanding of combustion safety, the U.S. Consumer Product Safety Commission’s guide to carbon monoxide is an excellent resource.
| Reason | How Common | Fix |
|---|---|---|
| Clogged burner ports | Very common | Clean the burner cap |
| Misaligned burner cap | Common | Reseat the cap properly |
| Wrong air-to-gas ratio | Less common | Adjust the air shutter |
| Damaged burner base | Rare | Replace the burner |
How to Realign a Misplaced Burner Cap
Sometimes the flame is yellow simply because the burner cap isn’t sitting flat and centred on the burner base.
Here’s how to inspect and fix it:
- Turn off the stove and let it cool completely.
- Lift off the grate and burner cap.
- Check the bottom of the burner — there will almost always be a small notch or slot that fits onto a pin or tab on the base.
- Replace the cap, making sure it sits flat and level with the notch properly aligned.
- Push it down gently to confirm it’s fully seated.
- Test the flame.
Takes less than two minutes and has fixed yellow flame issues for me more times than I care to admit.
The Air Shutter Adjustment (A Bit Advanced)
If cleaning and reseating don’t clear up the yellow flame, you may need to adjust the air shutter. The air shutter is a small metal flap at the point where the gas line connects to the burner. It regulates the amount of air mixed with the gas.
This adjustment varies by stove model, so check your owner’s manual. It typically involves loosening a small screw and turning the shutter slightly. If you’re not comfortable doing it yourself, a technician can handle it in under half an hour.
Secret Tip #4 — The Thermocouple Is the Most Overlooked Component in Gas Stove Troubleshooting
This tip primarily applies to gas stoves with pilot lights or standing pilot systems — which are older stoves. But even some newer stoves have a version of this component, so it’s worth knowing about.
I learned about thermocouples the hard way when my stove would light, burn for a few seconds, and then go out. Every single time.
I cleaned the burner. I checked the igniter. I even changed the burner cap. Nothing worked.
The culprit was a dirty, defective thermocouple.
What Is a Thermocouple and Why Does It Matter?
A thermocouple is a safety device. It’s a thin metal rod or probe that lives in the flame. When it heats up, it produces a very small electrical signal that tells the gas valve a flame is present and allows more fuel through.
If the thermocouple is:
- Dirty or coated in residue and cannot detect heat properly
- Bent away from the flame and not getting hot enough
- Worn out and no longer producing a signal
…the stove assumes the flame has gone out — even when it hasn’t — and cuts off the gas. Hence the flame that ignites, then dies within seconds.
For more in-depth guidance on diagnosing these kinds of issues, Gas Stove Repair Basics is a solid resource worth bookmarking.
How to Test and Clean a Thermocouple
- Locate the thermocouple — the small probe near the pilot flame (or main burner) connected to a thin copper or metal tube.
- Make sure the stove is off and completely cooled down.
- Using fine steel wool or 400-grit sandpaper, gently clean the tip of the thermocouple.
- Check the angle — the tip needs to be positioned directly in the flame, not off to the side.
- If it’s bent, carefully bend it back so the tip will sit in the flame.
When to Replace the Thermocouple
Thermocouples are inexpensive — usually $10 to $25, depending on your stove model. If cleaning doesn’t do the trick, replacement is nearly always the next step before calling a technician.
Replacement typically involves:
- Disconnecting the thermocouple from the gas valve
- Removing the probe from its bracket
- Installing the new one and reconnecting
This takes most people 20–30 minutes. Just make sure to get the correct thermocouple for your stove’s model number.
Never Skip These Safety Rules When Repairing a Gas Stove
Before wrapping up, let’s be direct about safety. Fixing a gas stove is not like fixing a toaster. These ground rules are non-negotiable:
- Always shut off the gas supply at the shutoff valve before performing any repair beyond a surface cleaning. The shutoff valve is typically at the rear of the stove or under the counter nearby.
- Never use an open flame to check for gas leaks. Apply soapy water to joints and look for bubbles.
- If you smell gas strongly, don’t touch any switches. Get out of the house and call your gas company immediately.
- Every home with a gas stove should have carbon monoxide detectors. If you don’t have one, get one now.
- Know your limits. Cleaning a burner cap: DIY-friendly. Replacing a gas valve: call a pro.
A Basic Troubleshooting Flow Chart to Use Before Calling a Technician
| Problem | Check First | Check Second | Call a Pro If… |
|---|---|---|---|
| Burner won’t light | Clean burner cap and ports | Dry and clean the igniter | No spark after cleaning |
| Flame goes out after lighting | Relight while holding knob longer | Clean/adjust thermocouple | Still goes out every time |
| Yellow or orange flame | Reseat burner cap | Clean burner ports | Flame still yellow after cleaning |
| Clicking won’t stop | Dry out the igniter | Check for debris on igniter | Clicking continues after 24 hours |
| Uneven flame | Clean all ports | Check cap alignment | Burner base is cracked or warped |
| Weak flame on all burners | Clean all caps | Check gas supply pressure | Gas pressure issue confirmed |
Frequently Asked Questions
Q: Is it safe to repair a gas stove myself? Most homeowners can safely handle simple repairs such as cleaning burner caps, drying igniters, and reseating burner caps. Any work on gas lines, valves, or internal components should be performed by a licensed technician.
Q: Why is my gas stove clicking even when it’s not on? This is almost always due to food debris or moisture on the igniter. Thoroughly clean and dry the igniter. If clicking persists for more than 24 hours after drying, the igniter switch may need replacement.
Q: How often should I clean my gas burners? Wipe the surface down after each use. Deep clean the burner caps and ports at least monthly — more frequently if you cook regularly or have regular boil-overs.
Q: What does a yellow flame on a gas stove mean? A yellow or orange flame indicates incomplete combustion — the gas isn’t igniting properly. This can undercut cooking performance and, in severe cases, create carbon monoxide. Realign the burner cap and clean the ports.
Q: Can I replace a thermocouple myself? Yes, this is a manageable DIY project on most stoves. Thermocouples are inexpensive and generally screw in and out. Look up your stove’s model number and order the correct replacement part.
Q: My burner only lights on one side — why? That typically means some ports on the burner cap are clogged while others are clear. A thorough port-by-port cleaning with a toothpick and toothbrush should resolve it.
Q: How can I tell if my igniter is cracked vs. just dirty? A dirty igniter will often produce weak or intermittent sparks, or click continuously without igniting. A faulty igniter produces no spark at all. Clean it first — if there’s still no spark after cleaning and drying, it likely needs to be replaced.
Wrapping It All Up
Gas stove issues have a reputation for being complex and costly.
They usually aren’t.
The four fundamentals covered here — cleaning the burner caps, drying and cleaning igniters, addressing a yellow flame, and checking the thermocouple — resolve nearly all of the day-to-day stove issues that homeowners face.
There are no real “secrets,” of course. It’s the mindset behind them: diagnose before you fix. Nine times out of ten, it’s a simple, inexpensive problem that can be completely resolved at home with basic tools and 30 minutes of your time.
I wasted money on service calls and replacement parts before I learned these fundamentals. You don’t have to.
Start with the burner cap. Work through the list step by step. And always, always prioritise safety.
If you follow these steps and nothing works — that’s when to call a professional. At least at that point you’ll have eliminated the simple causes, which speeds up their diagnosis and reduces your bill.