Gas Stove Repair Basics – Habitual Maintenance Can Save You Hundreds in Repairs
Learn 7 clever, simple habits that help keep your stove operating safely for years.
Gas Stove Repair Tips: 7 Simple Maintenance Habits to Make Your Stove Last Longer
Your gas-burning stove is a workhorse, pushing through day after day. Breakfast, lunch or dinner — it never takes a day off. But for most people, the only time they think about their stove is when it doesn’t work. By then, a minor problem has often become an expensive one.
The good news? You don’t have to be a technician to keep the stove in great condition. A few wise behaviors, practiced consistently, can avert most ordinary breakdowns. These gas stove repair basics maintenance habits are simple, affordable and downright effective.
This guide takes you through seven of the best ones — all framed in everyday language, with tips you can use today.
The Importance of Stove Maintenance
The vast majority treat their gas stove as if it were a piece of furniture. They clean it when it appears dirty and ignore it the rest of the time. That’s a costly mistake.
Gas stoves have moving parts, tiny spaces and gas connections that need ongoing care. When grease blocks a burner, the flame is uneven. If a valve stiffens up, it can leak. The igniter ports become clogged with food debris and the stove will no longer light properly.
These are not overnight problems. They accumulate slowly — until one day your stove goes on the fritz halfway through a meal or, worse, turns into a safety hazard.
Regular maintenance breaks that cycle. It keeps things functioning the way they’re supposed to, prolongs the life of the appliance and saves you real money.
Quick Fact: With the right care, a gas stove lasts 15 years. Without it, that lifespan can be reduced to 8–10 years.
Habit #1 — Clean the Burner Caps and Grates After Each Cooking Session
This is the simplest — and most overlooked — habit on the list.
Grease, bits of food and drips of liquid land on the burner caps and grates each time you cook. If you don’t get rid of them, they cook into the surface and block the tiny holes in the burner cap that control gas flow.
A blocked burner cap means:
- Uneven flames
- Flames that are yellow or orange rather than blue
- Longer heat-up times
- Possible gas buildup
How to Properly Clean Them
First, allow the burners to cool down. Never clean hot burners — it’s a burn hazard and can warp the metal.
- Take out the grates and burner caps.
- Use a non-abrasive sponge to wash them in warm, soapy water. For stuck-on grease, soak for 15–20 minutes first.
- Remove any clogged holes in the burner cap using a toothpick or soft brush. Do not use metal toothpicks — they can scratch the ports.
- Rinse everything well and dry thoroughly before returning parts. Water left inside the burner can affect ignition.
Do this after every heavy cooking session, or at minimum once a week with light use.
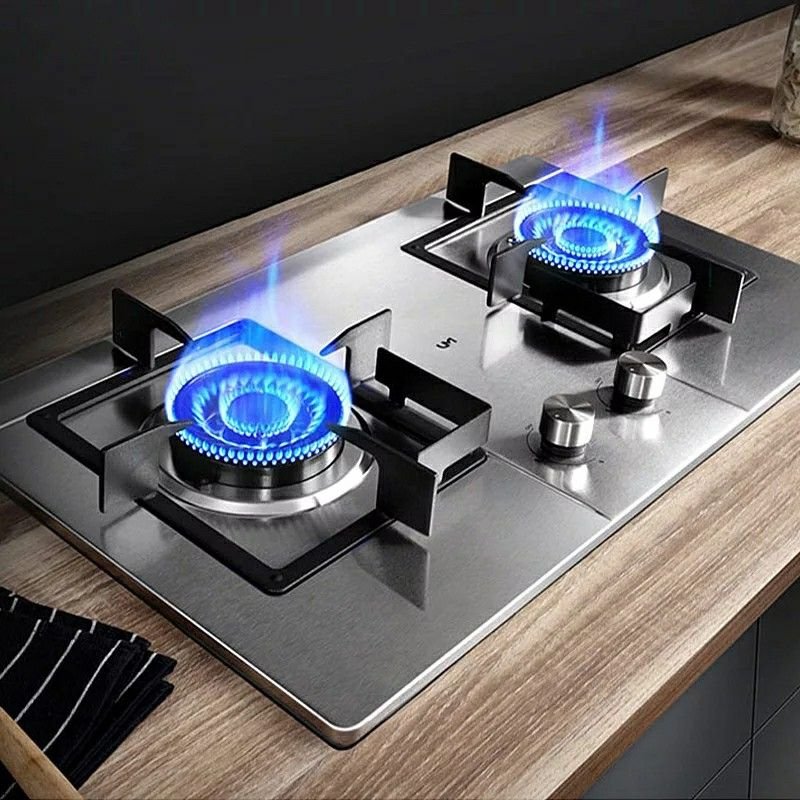
Habit #2 — Check Your Flame Color Regularly (It Tells You Everything)
Your burner flame is a health report on your stove. It provides immediate feedback on whether the gas-air mixture is balanced.
| Flame Color | What It Means |
|---|---|
| Steady blue | Healthy, clean burning |
| Blue with little yellow tips | Slightly off but usually OK |
| Mostly yellow or orange | Blocked ports or air mix problem |
| Red or bright yellow | Possible carbon monoxide risk |
| Lifting or unsteady flame | Gas pressure issue or clog |
So what to do if the flame appears off?
A mostly yellow or orange flame nearly always indicates dirty burner ports. Wash the burner caps as described above.
If cleaning does not resolve the issue, an air shutter adjustment (a small opening near the burner base that regulates airflow) may be required. A technician can take care of that quickly and inexpensively.
A flame that lifts off the burner or blows out easily may indicate a gas pressure issue. Don’t attempt to fix this yourself — call a pro.
Check your flame every week. It only takes a few seconds.
Habit #3 — Always Keep the Igniter Clean and Dry
The igniter is the small ceramic piece that creates a spark when you turn the knob. It’s one of the most common reasons gas stoves develop problems.
The igniter’s biggest enemies are food spills, grease and moisture. When any of these accumulate on the igniter, it cannot produce an appropriate spark. You’ll hear the click, but the burner won’t light — or it will light slowly and unevenly.
Simple Igniter Cleaning Steps
- Verify the stove is completely off and cool.
- Remove the burner cap above the igniter.
- Use a dry toothbrush or cotton swab to gently scrub away any buildup on the igniter tip.
- If it is wet, allow it to air-dry for 30 minutes before testing.
Never use water directly on the igniter — moisture is the primary reason for igniter failure.
When Clicking Won’t Stop
If your stove won’t stop clicking even when you haven’t been using it, that’s almost always from moisture or food debris around the igniter. Gently pat the area with a cloth to dry it and then allow it to air out. If the clicking persists for longer than a day, the igniter module will probably need to be replaced — a relatively inexpensive repair.
Habit #4 — Check and Maintain the Gas Connections Monthly
It’s not something most homeowners think about — but they should. A loose or corroded connection can be a major safety risk.
You don’t need to handle the connections yourself. But you should visually check them once a month.
The Soap Bubble Test (Safe and Simple)
The most effective DIY way to check for gas leaks is:
- Combine dish soap and water in a small bowl.
- Brush or apply soapy water onto the gas line connection on the back of the stove.
- Watch for bubbles.
Bubbles indicate a gas leak. Shut off the gas supply at once and contact your gas company or a licensed technician.
Do not use a flame to test for gas leaks. Ever.
Signs of a Connection Problem
- Gas odor near the stove (even faintly)
- Hissing noise from the back of the stove
- The stove takes longer than normal to light
- Headache or dizziness when cooking (this can signal carbon monoxide)
If you notice any of these signs, treat them seriously. A gas leak is rare but dangerous. According to the U.S. Consumer Product Safety Commission, carbon monoxide from gas appliances is a leading cause of accidental poisoning — making regular checks critical.
Habit #5 — Keep the Drip Pans and Stove Surface Clean
Below the burners sit the stove surface and drip pans. They catch everything that overflows or spills while cooking.
When drip pans are caked in old grease, a couple of things occur:
- Grease can smoke or start a fire
- Continued buildup makes the stovetop harder to clean
- Grease interferes with the burner area
Cleaning the Stove Surface Properly
Wipe down the stovetop after every use with a damp cloth while it’s still warm (but not hot). This prevents food from hardening.
For a deep clean, use a degreaser spray once a week. Allow it to sit a few minutes, then wipe. Steer clear of harsh abrasives on glass or enamel surfaces — they leave scratches that trap more grease over time.
Drip Pan Maintenance
- Remove drip pans monthly
- Soak in hot soapy water for 20–30 minutes
- Scrub with a non-scratch pad
- Replace drip pans when they’re beyond cleaning — they are inexpensive and make a big difference in stove cleanliness and performance
Habit #6 — Give Your Oven Burner and Broiler Regular Attention
Most people only think about the stovetop. But if your gas stove includes an oven, the oven burner requires just as much care.
Oven interiors collect grease, food drips and burned residue over time. This affects heat distribution and can generate smoke and unpleasant odors during cooking.
Oven Cleaning Schedule
| Frequency | Task |
|---|---|
| After every use | Wipe up fresh spills before they bake on |
| Monthly | Full interior wipe-down with oven cleaner |
| Every 3–6 months | Deep clean including racks and walls |
| Annually | Check oven burner ports for clogs |
How to Clean the Oven Burner
In most gas ranges, the oven burner is located at the bottom of the oven. Once the oven has cooled, you can lift out the floor panel (in most models, it lifts right out) to expose the burner.
Use a soft brush to carefully remove any debris from the ports. Never introduce water into the oven burner area. If you notice heavy buildup or the oven takes a long time to preheat, have a technician inspect the burner.
The Self-Clean Function — A Cautionary Note
Many gas ovens come with a “self-cleaning” feature that incinerates residue at extremely high temperatures. It has its uses, however it puts a lot of strain on the oven’s components. Only use it two or three times a year.
Habit #7 — Schedule a Professional Tune-Up Every 1–2 Years
Doing some of the upkeep yourself helps tremendously. But some things require a trained eye and professional tools.
A licensed appliance technician can check things that you can’t easily check yourself:
- Gas pressure at the burner
- Status of all internal valves and seals
- Thermostat accuracy (important for baking)
- Ignition system performance
- Safety shut-off valve function
What a Typical Professional Tune-Up Includes
| Service | Why It Matters |
|---|---|
| Gas pressure test | Ensures proper combustion and efficiency |
| Valve inspection | Catches leaks or stiff valves early |
| Burner calibration | Keeps heat output accurate |
| Igniter check | Prevents future lighting failures |
| Safety valve test | Critical for household safety |
Generally, a basic tune-up runs between $75 and $150 — a small price compared to a major repair or full stove replacement.
Put it on a calendar reminder so you don’t forget.

Quick-Reference Maintenance Schedule
| Task | How Often |
|---|---|
| Wipe burner caps and grates | After every heavy use |
| Check flame color | Weekly |
| Clean igniter tips | Weekly or after spills |
| Wipe stovetop surface | After every use |
| Clean drip pans | Monthly |
| Soap bubble gas leak test | Monthly |
| Deep clean oven interior | Every 1–3 months |
| Replace worn drip pans | As needed |
| Professional inspection | Every 1–2 years |
Warning Signs That Something Is Wrong With Your Stove
Some issues won’t wait for the next scheduled cleaning. Know these red flags:
- Lingering smell of gas — Turn off the gas, open windows and contact your gas company
- Flame goes out — Possible bad thermocouple or gas valve issue
- Burner takes longer than 4–5 seconds to ignite — Probably a dirty or defective igniter
- Loud popping on lighting — Gas buildup before ignition; clean burner ports
- Uneven cooking in the oven — Could be a blocked oven burner or failing thermostat
- Won’t stop clicking — Moisture or debris in the igniter area
- Knob is loose or difficult to twist — Valve wear; get it checked
Do not attempt to service gas valve or internal component issues yourself. These require licensed professionals.
FAQs — Gas Stove Maintenance and Repair Basics
Q: How often should I perform a full deep clean of my gas stove? A: Every 1–3 months for the inside of the oven. For the stovetop and drip pans, a daily wipe keeps heavy buildup from ever forming.
Q: Is it OK for me to use steel wool on my burner caps? A: No. Steel wool can scratch and damage the surface of burner caps, which can affect whether they burn evenly. Use a soft brush or non-scratch sponge instead.
Q: The flame on my burner is yellow although it lights. Is that dangerous? A: It’s not immediately dangerous, but yellow flames emit more carbon monoxide than blue flames. Clean the burner ports and examine the air shutter. If the issue persists, call a repair technician.
Q: Can I inspect around the gas line myself safely? A: Visual inspection and the soap bubble test are safe DIY checks. But never disconnect, tighten or adjust the gas line connections yourself. Always hire a professional for anything that involves the actual gas supply.
Q: How can I tell if my igniter needs to be replaced? A: If you’ve cleaned the igniter and it still won’t light after multiple attempts, the igniter needs to be replaced. This is a routine, inexpensive repair.
Q: Why does my gas stove burner keep clicking after it’s turned off? A: This is usually caused by moisture or food debris near the igniter. Gently dry the area and allow it to air out. If it persists beyond 24 hours, the igniter switch may be faulty.
Q: Can I get my stove to last longer than 15 years? A: Absolutely. Stoves with regular upkeep and periodic service often last 18–20 years or more. The key is not waiting for a problem to appear before responding.
Q: How much does it typically cost to repair a basic gas stove? A: Routine repairs, such as replacing an igniter, run $100–$200. Valve repairs typically run $150–$300. Regular maintenance often identifies problems before they spiral out of control, costing significantly less than emergency repairs.
Putting It All Together
Follow these simple habits and your gas stove will last for decades. They don’t require special skills or costly tools — just consistency.
Clean your burner caps regularly. Watch your flame color. Keep the igniter dry. Check gas connections for leaks. Take care of the oven too. And every year or two, have a pro give the entire unit a thorough inspection.
These seven habits work together. Each one protects a unique part of your stove. Together, they add years to the life of your appliance and save you from breakdowns that spoil dinner plans — and put a dent in your wallet.
Your stove has served you well. The best way to repay the favor is with a little regular attention.