Gas Stove Repair Basics Maintenance Secrets: 8 That Work
Your gas stove puts in work day after day. Breakfast, lunch and dinner — it never gets a day off. But most people only pay attention to their stove when things go awry. A burner won’t light. The flame looks weird. Something smells off.
The good news? The majority of issues with gas stoves are more easily fixed than you might think. You don’t have to be a professional mechanic. All you need is the proper knowledge and some time.
In this article, we outline 8 practical gas stove repair basics maintenance tips that work. Whether you’re facing down a stubborn burner, or you just want to keep your stove looking spiffy, this article will help.
Let’s get into it.
Why It Really Matters to Maintain Your Gas Stove Regularly
Before we get into the tips, let’s address why this stuff matters.
An unclean gas stove isn’t just a nuisance — it can be unsafe. Gas leaks, carbon monoxide buildup, and fire hazards are all potential dangers if a stove is carelessly maintained.
Regular maintenance is also a great money saver, on top of safety. An efficiently running stove uses less gas, which translates to lower energy bills each month.
Here’s a quick view of what ignoring maintenance can add up to:
| Problem Ignored | Potential Consequence | Estimated Repair Cost |
|---|---|---|
| Clogged burner ports | Uneven flame, wasted gas | $50–$150 |
| Dirty igniter | Burner won’t light | $100–$200 |
| Gas valve buildup | Dangerous gas leak | $200–$500+ |
| Worn door seals (oven) | Heat loss, high bills | $75–$175 |
| Faulty thermocouple | Pilot light keeps going out | $150–$300 |
A lot of these issues could be completely avoided with some simple maintenance.
1. Clean Your Burner Caps and Heads Properly
This is the No. 1 gas stove repair basics maintenance task most people skip — or do incorrectly.
Why Burner Caps Get Clogged
Every time you cook, grease and food splatter onto (and into) your burner caps. Over time, this gunk clogs the tiny holes (called ports) through which gas escapes. When those ports are clogged, your flame appears weak and yellow rather than blue.
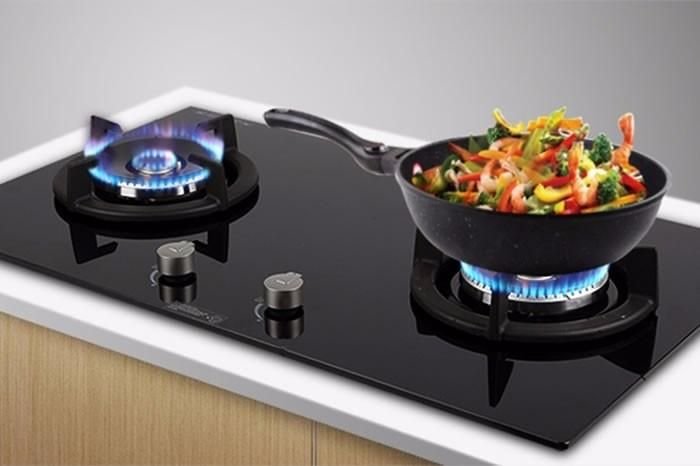
A healthy flame is always blue with a strong inner cone. If it looks orange or yellow, it’s most likely dirty burner caps.
How to Clean Them Properly
Step 1: Turn the stove off and ensure it is completely cool.
Step 2: Remove the burner grates and caps — they just sit on top, no screws required on most models.
Step 3: Place the caps in warm, soapy water for 20–30 minutes.
Step 4: Apply a soft brush (an old toothbrush works well) to scrub off any buildup.
Step 5: Clear any clogged ports with a toothpick or a straightened paper clip. Do not use a toothpick inside the port if it can break.
Step 6: Rinse everything and allow to air dry completely, then replace.
Do this every month and your burners will remain consistent and efficient.
2. Fix a Constantly Clicking Igniter
There are few things more annoying than an igniter that won’t stop clicking after a burner is lit. Or, worse — one that won’t click at all.
What Causes Constant Clicking?
The igniter is clicking because it’s covered in water or dirt. Food debris and moisture near the igniter electrode send false signals, causing it to spark repeatedly.
This is one of the most common gas stove repair problems for homeowners — and it has an easy solution.
The Fix
- Turn off the burner completely.
- Remove the burner cap and grate.
- Find the little ceramic igniter nub just above the burner head.
- Use a dry cloth to wipe it clean. For stubborn residue, try a cotton swab moistened with rubbing alcohol.
- Allow everything to dry for 10–15 minutes before testing.
If cleaning doesn’t help and the igniter won’t spark at all, the igniter module may need to be replaced. This is something you can do yourself with a replacement part from a hardware store — typically under $30.
Quick Igniter Troubleshooting Chart
| Symptom | Likely Cause | DIY Fix? |
|---|---|---|
| Clicks but no flame | Wet or dirty igniter | Yes — clean and dry it |
| No clicking at all | Faulty igniter module | Yes — replace module |
| Clicks nonstop | Too much moisture or debris | Yes — clean and dry it |
| Flame comes on then dies | Thermocouple problem | Sometimes |
3. Make the Stove Surface Sparkle (And Why That’s Not Just for Looks)
A clean stovetop isn’t merely beautiful — it has a direct impact on your stove’s performance.
Grease Accumulation Is a Fire Hazard
Grease that builds up around your burners can catch fire if the flame gets too high, or during a flare-up. That is a genuine fire hazard that is 100% preventable.
The Proper Way to Clean a Gas Stovetop
Avoid harsh abrasive cleaners — they can scratch the surface and ruin the finish.
For daily wipe-downs: Wet a cloth with water and add one drop of dish soap. Once the stove is cool, wipe after every use.
For weekly deep cleans: Combine equal parts white vinegar and water in a spray bottle. Spray the surface, allow to sit 5 minutes, then wipe clean. For tough stains, sprinkle some baking soda before spraying the vinegar. It fizzes and degreases naturally.
For the grates: Soak cast iron grates in hot, soapy water. Scrub with a stiff brush. Dry completely to prevent rust.
Pro Tip: Don’t return wet grates to the stove. Moisture around burners can lead to clicking and uneven flames.
4. Make Sure Your Flame Size Is Correct
This one surprises a lot of folks. The size, shape and color of your flame are direct indicators of the health of your stove.
What Does a Healthy Flame Look Like?
- Color: Blue with a slightly darker blue inner cone
- Shape: Uniform and stable around the burner
- Size: Matches the burner setting (Low = small, High = large but controlled)
Warning Signs in Your Flame
| Flame Color / Behavior | What It Means |
|---|---|
| Yellow or orange | Incomplete combustion, ports likely clogged |
| Very uneven (one side stronger) | Partially blocked ports |
| Way too large and wobbly | Too much gas pressure |
| Tiny even on high | Clogged ports or low gas pressure |
| Flame lifts off burner | Too much air in the system |
How to Adjust the Air Shutter
Each burner has an air shutter — a small opening that adjusts the amount of air mixing with the gas. When the flame is yellow, it’s not receiving enough air. When the flame lifts off the burner, it’s too much.
The air shutter is generally found beneath the stovetop, right where the burner tube meets the valve. You may have to remove the top panel to access it. Loosen the screw, adjust the shutter slightly and test the flame. If you’re not comfortable doing this, call a technician.
5. Replace a Faulty Thermocouple (Before It Becomes an Expensive Problem)
If you have a pilot light stove (older models), the thermocouple is essential. It’s a safety device that shuts off the gas if the pilot light goes out.
Signs Your Thermocouple Is Failing
- The pilot light goes out soon after you light it
- You must hold the pilot button down longer than usual
- The burner lights up and then goes out within a minute
How to Replace It Yourself
A thermocouple is a small metal rod that touches the pilot flame. Replacing it is one of the more involved gas stove repair tasks — but you can do it.
What you’ll need:
- Replacement thermocouple (match it to your stove model — often $10–$25)
- Adjustable wrench
- Screwdriver
Steps:
- Shut off the gas supply at the shutoff valve.
- Remove the burner assembly to access the pilot and thermocouple.
- Unscrew the thermocouple from the gas valve (typically a simple nut connection).
- Remove the old one and place the new one in the same position.
- Reconnect and tighten the nut. Don’t overtighten.
- Turn the gas back on and test the pilot.
If you smell gas at any stage and cannot locate its source, stop immediately and call a professional.
6. Clean the Oven Burner (A Commonly Neglected Area)
The stovetop gets most of the attention, but the oven burner at the bottom is frequently forgotten. This burner needs love too.
Signs the Oven Burner Needs Attention
- The oven takes longer to preheat than it used to
- Food cooks unevenly (burnt on one side, raw on the other)
- There is visible rust or buildup on the burner element
- The oven flame is yellow or orange
Cleaning the Oven Burner
Step 1: Make sure the oven is turned off and completely cooled.
Step 2: Remove the oven racks and the bottom panel (it usually unlatches or has two screws).
Step 3: The burner is the long tube at the bottom with holes along it. Use a soft brush to clean the holes. Never use water directly on a gas oven burner.
Step 4: Clean up the surrounding area with a damp cloth.
Step 5: Replace the bottom panel and racks.
If the burner is visibly cracked or damaged, it needs to be replaced — not just cleaned. A cracked burner is a safety hazard.
7. Regularly Test for Gas Leaks (This One Can Save Your Life)
No gas stove maintenance guide would be complete without addressing gas leaks. This is non-negotiable.
How Often Should You Check?
At least once every three months — and immediately if you smell gas, hear a hissing noise, or notice your gas bill spiking for no apparent reason.
The Simple Soap Test
This is the simplest DIY method and it works perfectly.
What you need: Dish soap and water (or a commercial leak detector spray)
How to do it:
- Ensure the burners are off, but the gas supply is on.
- Mix dish soap with a small amount of water to form a thick, bubbly solution.
- Apply the solution to all gas connections — the flexible hose behind the stove, the shutoff valve and any visible fittings.
- Watch for bubbles forming. Bubbles mean gas is escaping.
If you find a leak:
- Immediately turn off the gas supply
- Open windows and doors
- Do not use any electrical switches or open a flame
- Leave the house and call your gas company
Signs of a Gas Leak at a Glance
| Warning Sign | Action to Take |
|---|---|
| Rotten egg smell | Leave, call gas company |
| Hissing near connections | Soap test, then call if confirmed |
| Dead plants near stove | Could be an underground leak — test all connections |
| Higher bills suddenly | Test all connections |
| Dizziness or headache indoors | Ventilate, call immediately |
According to the U.S. Consumer Product Safety Commission, carbon monoxide from gas appliances is a leading cause of accidental poisoning indoors — making regular leak checks an essential part of home safety.
8. Schedule an Annual Professional Tune-Up
DIY maintenance matters a lot — but it can’t substitute for the pros.
What a Pro Can Do That You Can’t
A licensed gas appliance technician has tools and knowledge that most homeowners lack. During an annual tune-up, they typically:
- Check gas pressure with specialized gauges
- Inspect internal valves and seals
- Verify oven thermostat accuracy
- Thoroughly inspect the ignition system
- Check for carbon monoxide risks
- Confirm that all safety controls are functional
How Much Does It Cost?
| Service Type | Average Cost |
|---|---|
| Basic inspection | $75–$150 |
| Full tune-up | $100–$200 |
| Repair + tune-up combo | $150–$350 |
| Emergency service call | $200–$500+ |
Think of it like a car oil change — it may surface other small issues that are cheap to address now but costly if left to become breakdowns.
How to Find a Good Technician
- Look for certification from the Gas Technology Institute (GTI) or hire a licensed plumber/gas fitter in your area
- Check reviews on Google or Yelp
- Confirm they specialize in appliance repair (not just HVAC)
- Request a written estimate before any work begins
Maintenance Schedule: How Often to Do Each Task
Here’s a straightforward calendar to help you stay on top of it all:
| Task | Frequency |
|---|---|
| Check flame color and size | Monthly |
| Clean burner caps | Monthly (and after heavy cooking) |
| Oven burner deep clean | Every 3 months |
| Soap test for gas leaks | Every 3 months |
| Thermocouple inspection (older stoves) | Every 6 months |
| Professional tune-up | Annually |
Print this out and put it somewhere visible. Even a small amount of consistency goes a long way.
Safety Rules to Always Follow
Keep these rules in mind before attempting any gas stove repair or maintenance task:
- Always turn off the gas before touching any internal components
- Never use an open flame to check for a leak
- Do not use bleach-based cleaners on burner parts — they can corrode metal
- Make sure all parts are completely dry before reassembling
- If you smell gas and cannot locate its source, leave the house immediately
- Never attempt to fix gas valves or internal gas lines — those must be left to licensed professionals
Common Questions About Gas Stove Repair and Maintenance
Q: How can I tell if my gas stove needs repairs or just cleaning? Start with a thorough cleaning. The vast majority of performance issues — weak flames, clicking igniters, uneven heating — are simply the result of dirt and buildup going unaddressed. If cleaning doesn’t resolve the problem, then consider repair options.
Q: Is it safe to clean gas burners with water? Yes, but you must dry everything completely before putting it back. Wet components can cause igniter clicking and affect the flame. Never spray water directly onto a burner while it is installed.
Q: Why does my gas stove smell of gas when I first turn it on? A very brief whiff of gas immediately after you turn on a burner is normal — that’s unburned gas before ignition. If the smell persists after the burner lights, or if you smell gas when nothing is on, that’s a problem. Do the soap test immediately.
Q: Can I replace a gas stove igniter myself? Yes, this is a manageable DIY task for most models. You’ll need to order the correct part by model number (found inside the oven door or on the back of the stove). Watch a YouTube video specific to your model before you begin.
Q: How long does a gas stove last with proper maintenance? A well-maintained gas stove typically lasts 15 to 20 years. Without routine care, that lifespan drops significantly. Consistent gas stove maintenance is the key to getting full value from your appliance.
Q: What does a yellow flame on a gas stove mean? A yellow or orange flame indicates that the gas is not burning completely. This is typically caused by clogged burner ports or an air shutter that needs adjusting. It can also produce more carbon monoxide than a blue flame, so address it promptly.
Q: How can I prevent rust on my gas stove grates? After washing cast iron grates, dry them immediately with a towel, then place them in a warm oven for 10 minutes to remove all remaining moisture. You can also apply a very thin layer of cooking oil to help protect against rust.
Wrapping It All Up
Caring for your gas stove doesn’t have to be complicated or time-consuming. The 8 gas stove repair basics maintenance tips in this guide — from cleaning burner caps to scheduling annual tune-ups — are all practical steps that most people can take without breaking the bank or sacrificing much time.
The key is consistency. A few minutes of regular maintenance can prevent costly repairs, safety hazards and the frustration of a stove that won’t cooperate.
Start this week: clean your burners, check your flame and run a gas leak test. Build from there. Your stovetop — and your wallet — will thank you.
And remember: when in doubt, call a professional. Gas appliances are powerful tools, and knowing your limits is just as important as knowing the basics of maintenance.