

Gas Leaks: 5 Gas Stove Repair Basics Safety Tips That Could Save Your Family
Meta Description: Gas stove repair basics safety tips to save your life. Discover 5 effective tips for avoiding dangerous gas leaks, tackle common problems and make your kitchen safe.
Why Gas Stoves Deserve More Attention Than You Think
Your gas stove works hard day in and day out.
It keeps your morning coffee warm, cooks your dinner and rarely produces a second thought — until something malfunctions.
Gas stoves are incredibly reliable. But they come with one risk that should never be overlooked: gas leaks.
A gas leak is more than an inconvenience. It is capable of causing explosions, fires and carbon monoxide poisoning. Faulty gas appliances are linked to thousands of home incidents each year.
The good news? These incidents are entirely preventable in most cases.
You don’t need to be a pro technician to secure your residence. Simple repair knowledge and a handful of basic safety habits can go a long way.
This post guides you through 5 crucial gas stove repair basics safety tips every homeowner should have in their kit. These tips are practical, easy to follow and can literally save your life.
Let’s get into it.
What Are the Dangers of Gas Stoves in the First Place?
Before we get into the tips, it can be helpful to understand why gas stoves can become hazardous.
Gas stoves are fueled by either natural gas or propane. These fuels are highly flammable. When functioning as intended, gas burns cleanly through the burners on a stove. But when something malfunctions or deteriorates, gas can seep into your kitchen undetected.
That’s where the danger lies.
In a closed space, unburned gas accumulates quickly. A small spark — from a light switch, a phone or even static electricity — can set it off.
Here are the most frequent issues that result in gas stove leaks:
| Cause | Description |
|---|---|
| Worn burner seals | Old rubber seals can crack, through which gas leaks |
| Loose gas supply line | Over time, vibrations and use loosen connections |
| Damaged igniter | When the igniter is faulty, it prevents gas from properly lighting |
| Cracked burner cap | Physical damage upsets the pathway of gas to flame |
| Blocked burner ports | Food debris disrupts proper flow of gas and combustion |
| Corroded valves | Rust and wear cause the slow failure of gas control valves |
Knowing these underlying causes keeps you ahead of trouble.
Safety Tip No. 1 — Know How to Smell, See and Hear a Gas Leak Before It Escalates
The Three-Sense Check Every Cook Should Know
The very first gas stove repair basics safety tip is training your senses.
Most people only investigate when something breaks badly. But gas leaks often provide early warning signs — if you know what to look and listen for.
The Smell Test
Pure natural gas is actually odorless. Gas companies inject a chemical known as mercaptan to give it that familiar rotten egg or sulfur smell. If you ever get that smell in your kitchen, take it seriously right away.
Pause whatever you’re doing and look into it.
The Sound Check
A gas leak near a valve or pipe connection commonly produces a faint hissing sound. It’s soft and easy to overlook against background noise.
Get used to periodically switching off all appliances and sitting in silence close to your stove. Pay attention to the area around the burner knobs, the back of the stove and the gas line that runs at floor level.
The Visual Inspection
Look for these visual clues:
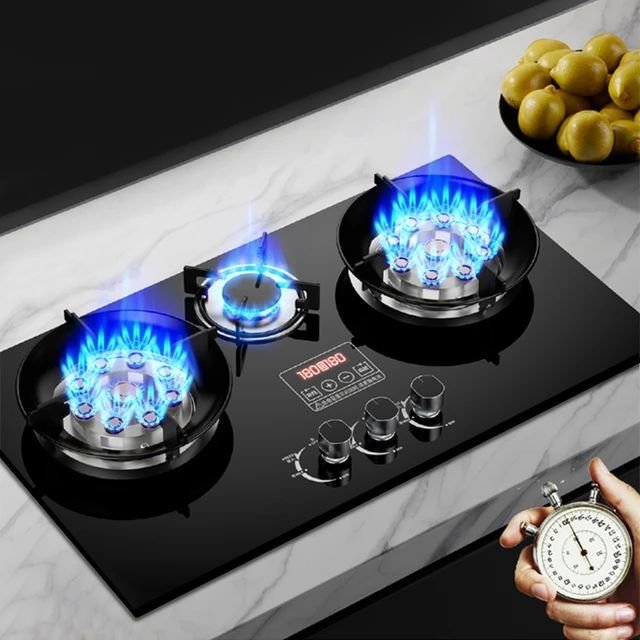
- Yellow instead of clean blue flames
- Burners that refuse to light despite repeated attempts
- A flame that keeps putting itself out
- Bare or yellowing houseplants in your stove area (a potential sign of gas displacing oxygen)
- Moisture or frost visible on a gas pipe (rare, but an indicator of pressure issues)
What to Do When You Suspect a Leak
- Don’t switch anything on or off — even a light switch can spark
- Open windows and doors immediately
- Evacuate the building calmly
- Call the gas company from outside or from a neighbor’s home
- Do not re-enter until a technician has cleared the area
This isn’t an overreaction. It’s exactly the right response.
Safety Tip No. 2 — Clean Your Burners Regularly (It’s More Important Than You Think)
How a Dirty Burner Becomes a Dangerous Burner
The majority of people clean the surface of their stovetop. But how often do you get inside the burners and clean?
Over time, burner ports — the small holes that discharge gas — get gunked up with food grease, boiled-over liquids and debris. Gas flow is uneven when ports get clogged. This results in incomplete combustion, uneven flames and, in some instances, gas that fails to ignite altogether.
Unignited gas resting in your kitchen is a danger, plain and simple.
Cleaning your burners is one of the simplest and most effective gas stove repair basics safety tips because it stops buildup before it becomes a bigger problem.
How to Clean Your Gas Burners Step by Step
What you’ll need:
- Warm soapy water
- An old toothbrush or a soft brush
- A thin needle or a straightened paperclip
- A dry cloth
Steps:
- Ensure the stove is fully off and cooled down
- Remove the burner grates and set aside
- Remove the burner caps (they usually just pull off)
- Take off the burner heads if they’re removable
- Submerge the caps and heads in warm soapy water for 20–30 minutes
- Scrub away grease and residue with the toothbrush
- Gently use your needle to clear each port hole — do not enlarge them, just unblock them
- Rinse everything thoroughly and allow to fully dry before reassembly
- Never return damp burner components — moisture may cause the igniter to misfire
How Often Should You Clean?
| Cooking Frequency | Recommended Cleaning Schedule |
|---|---|
| Daily cooking | Every 2–3 weeks |
| Moderate (4–5x/week) | Once a month |
| Light cooking | Every 6–8 weeks |
| After any spill/boilover | Immediately after cooling |
This easy habit can prolong the life of your stove and greatly reduce the risk of leaks.
Safety Tip No. 3 — Check and Maintain the Gas Supply Line Connections
The Component Most Homeowners Never Look At
There is a flexible metal hose behind or underneath your stove that connects the appliance to your home’s gas supply. It is referred to as the gas supply line or flex connector.
This hose is one of the most overlooked components in your entire stove setup.
Over time, it can:
- Form little cracks from bending or crimping too much
- Corrode from exposure to moisture
- Loosen at the joints from the stove being moved
- Deteriorate simply due to age (most flex connectors have a 10–20 year lifespan)
A loose or damaged flex connector is one of the top causes of household gas leaks.
How to Safely Check Your Gas Supply Line
The first inspection does not require tools. Here’s what to do:
Step 1 — Look at the hose
Pull your stove out a little from the wall (carefully). Examine the corrugated metal hose. Check for:
- Visible kinks, bends, or crimps
- Rust, discoloration, or corrosion spots
- Any part that appears crushed or flattened
Step 2 — Check the connection points
The hose connects to the gas valve at one end and the stove’s inlet at the other. Both connections should feel firm. They shouldn’t wiggle or feel loose when you apply a little pressure.
Step 3 — The soap bubble test
This is the most reliable DIY leak test:
- Combine a few drops of dish soap with water
- Use a brush or cloth to apply the soapy solution to both connection points
- Turn on the gas (but do not light the stove)
- Watch for bubbles forming at any connection point
Bubbles mean gas is escaping. Even tiny bubbles signal that something is wrong and needs attention.
If you notice bubbles, immediately turn off the gas valve and contact a licensed plumber or gas technician.
For more detailed guidance on this and other stove maintenance topics, visit Gas Stove Repair Basics — a helpful resource for homeowners looking to keep their gas appliances in top shape.
When to Replace the Flex Connector
- Replace it as a precaution if it’s older than 10 years
- Check for any visible damage and replace immediately if found
- After moving the stove several times, check for stress damage
- Bubbles in the soap test mean replacement is mandatory
Never try to repair a damaged flex connector with tape or sealant. It must be replaced entirely.
Safety Tip No. 4 — Understand Your Igniter System and Fix Clicking Issues Fast
That Clicking Sound Is Trying to Tell You Something
If you have ever heard your gas stove clicking repeatedly even when you aren’t trying to light it, you know how irritating it is.
But here’s what most people don’t know: a stuck or faulty igniter isn’t just an annoyance — it’s a safety problem.
When an igniter keeps clicking or is unable to produce a proper spark, the stove may release gas without igniting it. Even a brief period of unlit gas release is an issue.
Understanding your igniter is a core part of gas stove repair basics safety practices.
How the Igniter Works
When you turn the knob of a burner, two things happen at once:
- The gas valve opens and gas flows toward the burner
- The electronic igniter fires up to ignite the gas
All of this takes place in less than a second under normal conditions. But if something goes wrong — gas flows and finds no spark or a delayed one — raw gas gets into your kitchen air.
Common Igniter Problems and What Causes Them
| Problem | Likely Cause | DIY Fix? |
|---|---|---|
| Constant clicking when not in use | Moisture beneath the igniter cap | Yes — dry thoroughly |
| No spark at all | Loose igniter wire | Check the wire connection |
| Weak spark that won’t ignite gas | Worn electrode | Replace the electrode |
| Clicks but flame won’t remain lit | Thermocouple issue | Professional repair recommended |
| Yellow or orange flames after lighting | Dirty burner ports | Clean the burner ports |
How to Stop the Igniter From Clicking Constantly
This is perhaps the most common complaint about gas stoves.
The #1 cause is moisture. Spilled liquid, steam from cooking or even high kitchen humidity gets under the igniter cap and causes it to misfire continuously.
Here’s how to fix it:
- Turn off the stove completely
- Remove the burner cap and grate
- Wipe the igniter area with a dry cloth
- Use a hairdryer on low heat to gently dry the igniter and surrounding area
- Allow it to air-dry for 30–60 minutes before reassembling
- Test by turning a knob — the clicking should stop
If drying doesn’t resolve the problem, the igniter module is probably defective. Replacement makes sense at that stage. This is a relatively easy DIY repair, but if you aren’t comfortable working around gas components, a technician can take care of it quickly and affordably.

Safety Tip No. 5 — Set Up a Gas Leak Detection System in Your Kitchen
Don’t Rely on Your Nose Alone
Here’s an uncomfortable truth: not everyone can smell gas leaks.
Some people have a diminished sense of smell due to age, illness, allergies or medications. Older adults and young children are particularly vulnerable. And although the rotten egg smell that companies add to gas is detectable to most people, it can be faint at low concentrations.
That’s why one of the smartest gas stove repair basics safety tips isn’t about repair at all — it’s about detection technology.
What Is a Gas Detector?
A gas detector (also known as a natural gas alarm or propane detector, depending on your fuel) is a small device that constantly monitors the air in your kitchen for gas concentration levels.
The alarm sounds when gas reaches a potentially dangerous level — often loud enough to wake you from sleep.
These devices are inexpensive, simple to install and genuinely life-saving.
According to the U.S. Consumer Product Safety Commission, installing gas and carbon monoxide detectors in your home is one of the most effective ways to prevent injury and death from gas-related incidents.
Types of Gas Detectors
| Type | How It Works | Best For |
|---|---|---|
| Natural gas detector | Detects methane in the air | Homes on natural gas lines |
| Propane detector | Detects propane (heavier than air, sinks to floor) | Homes using propane tanks |
| Combination detector | Detects both natural gas and carbon monoxide | Best all-around option |
| Smart gas detector | Connects to Wi-Fi and sends phone alerts | Tech-savvy homeowners |
Where to Place Your Gas Detector
Placement is more important than most people realize.
- Natural gas is lighter than air — it rises. Place your detector high on the wall or close to the ceiling.
- Propane is heavier than air — it sinks. Place propane detectors low to the ground, no more than 12 inches above the floor.
- Keep the detector within 10 feet of the stove
- Avoid placing it directly above the stove where steam and cooking heat can trigger false alarms
Additional Safety Hardware Worth Installing
Along with a gas detector, consider:
- Carbon monoxide detector — CO is odorless and lethal, and burning gas produces it
- Automatic gas shut-off valve — automatically cuts off the gas supply when a leak is detected
- Fire extinguisher (Class B) — designed for flammable liquid and gas fires
A Quick Reference Guide — All 5 Safety Tips at a Glance
| # | Safety Tip | Key Action |
|---|---|---|
| 1 | Train your senses | Smell, listen and look for early warning signs |
| 2 | Clean your burners | Clear clogged ports every 2–4 weeks |
| 3 | Inspect the gas supply line | Do the soap bubble test every 6 months |
| 4 | Fix igniter issues fast | Dry moisture, check wires, replace if needed |
| 5 | Install a gas detector | Place correctly based on gas type |
When You Need to Call a Professional
Relying on yourself for maintenance can help a lot. But sometimes contacting a licensed gas technician is the only safe option.
Call a professional immediately if:
- The soap bubble test shows bubbles at any connection point
- You smell gas but can’t identify where it’s coming from
- The stove produces a constant yellow or orange flame
- A burner valve is stuck, stiff or leaks when turned off
- You have replaced an igniter but the problem persists
- The flex connector is visibly damaged or over 10 years old
- Your gas detector alarm sounds and won’t reset
You should never attempt to fix internal gas valves, regulators or gas pipe connections yourself. These require special tools, certification and knowledge. A service call costs very little compared to the risk of getting it wrong.
Frequently Asked Questions About Gas Stove Safety and Repair Basics
Q1: How can I tell if my gas stove is leaking?
A rotten egg smell near the stove is the most familiar sign. Other signs include a hissing noise near the gas valve, flames that burn orange rather than blue and your gas detector alarm sounding. If you suspect a leak, do the soap bubble test on connection points.
Q2: Can I use a gas stove that keeps clicking?
A clicking stove when not in use typically has moisture issues. While it’s usually not immediately dangerous, it indicates that the igniter is misfiring — which means gas can escape without igniting. Wipe the igniter area dry and test it. If the clicking continues, refrain from using that burner until it can be fixed.
Q3: How frequently do I need to check my gas supply line?
Check it visually every 6 months. Do the soap bubble test once a year or whenever you move the stove. The flex connector should be replaced every 10 years or in the case of visible damage.
Q4: Can I replace a gas stove igniter myself?
Yes, in most cases. Replacing an igniter is a DIY-friendly gas stove repair. On most modern stoves, the igniter electrode simply unplugs and plugs back in. But if you’re unsure or the issue is with the gas valve, call a technician.
Q5: What should I do if my gas alarm sounds?
Cease all use of the stove immediately, leave all switches unchanged (do not turn anything on or off), open doors and windows as you exit, leave the building and call your gas company from outside. Do not go back in until professionals have cleared the area.
Q6: Where should a gas detector be installed in a kitchen?
For natural gas (methane), mount it high on the wall near the ceiling. For propane, install it low, no higher than 12 inches off the floor. Stay within 10 feet of your stove but not directly above it.
Q7: What’s the lifespan of a gas stove?
A well-maintained gas stove will usually last 15–20 years. After 15 years, it’s a good idea to have a technician inspect its key components — valves, regulators and seals — even if the stove appears to be functioning properly.
Wrap-Up — Small Habits That Safeguard Your Entire Home
Gas stoves are wonderful tools in the kitchen. They provide fine control over heat, quick cooking and reliable performance for years on end.
But they deserve respect.
These five gas stove repair basics safety tips are not difficult to follow. You don’t need an engineering degree or a toolbox full of equipment. Much of what is discussed here only takes minutes and a little mindfulness.
To recap what matters most:
- Use your senses to catch early signs of a gas leak
- Keep burners clean so gas flows and ignites properly every time
- Check your gas supply line at least twice a year with the soap test
- Fix igniter problems quickly — they’re more than just a nuisance
- Install a gas detector and place it in the right spot
These aren’t just tips. They’re habits that help keep your family, your home and your peace of mind safe.
Incorporate them into your normal routine, and your gas stove will continue to serve you safely for many years to come.
We’d always recommend that you get a licensed gas technician to do any repair that concerns internal gas valves and pipe connections, or anything else that you can’t safely handle yourself. Safety always comes first.