

5 Easy Gas Stove Repair Basics Setup Fixes That Changed My Kitchen
There was a time when my kitchen felt more like a place of daily frustration than comfort. Cooking, something I once enjoyed, slowly turned into a guessing game—would the flame stay steady, would the burner light, would the smell of gas suddenly make me panic? It wasn’t a complete breakdown, nothing dramatic enough to force immediate replacement, but it was the kind of slow inconvenience that chips away at your patience.
Looking back, I realize most of those problems weren’t complex. They were small, fixable issues—things I simply didn’t understand at the time. Once I learned a few basic repair and setup techniques, everything changed. The stove worked better, cooking became faster, and most importantly, I felt in control again.
This isn’t a technical manual. It’s a practical, experience-driven walkthrough of five simple fixes that made a real difference in my kitchen. Along the way, I’ll share the little details that matter, the mistakes I made, and the habits that now keep my stove running smoothly.
understanding the quiet signals your stove gives
Before jumping into repairs, I had to learn one important thing: gas stoves don’t usually fail suddenly. They communicate problems subtly. A weak flame, uneven heat, a clicking sound that doesn’t stop—these are all early warnings.
At first, I ignored these signs. I assumed it was just “how things are.” But once I started paying attention, patterns became obvious. One burner always took longer to ignite. Another had a flame that leaned to one side. The smell of gas would appear briefly and then disappear.
These weren’t random quirks. They were clues.
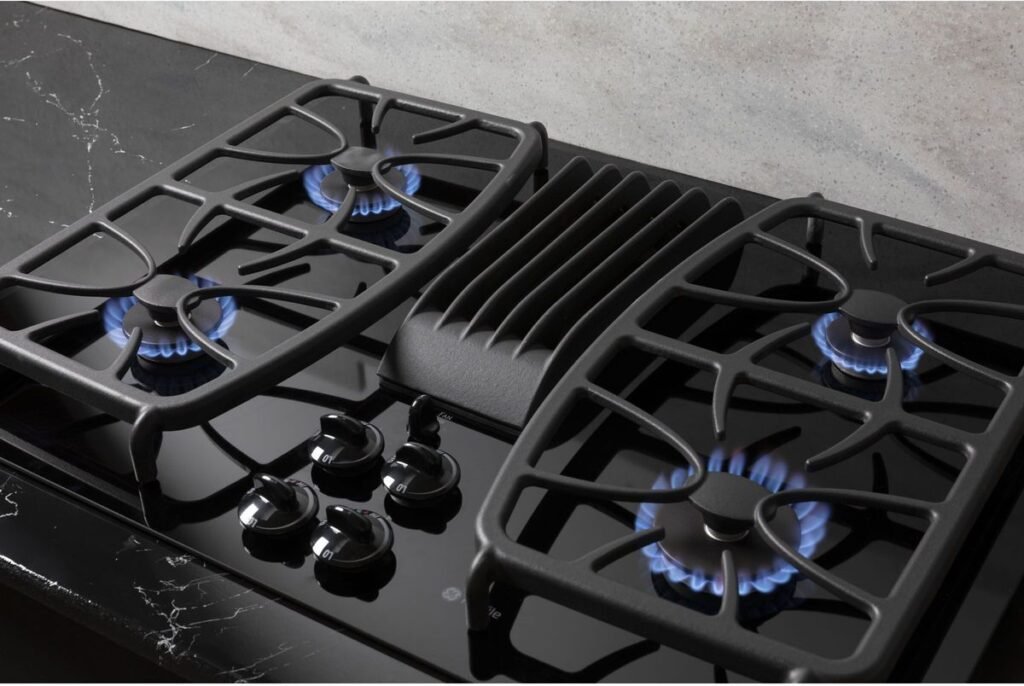
Fixing a gas stove starts with observation. Spend a few minutes watching how it behaves. Turn each burner on. Notice the color of the flame—it should be blue, not yellow or orange. Listen to the ignition. Smell the air. These small checks guide everything that follows.
fix one: cleaning the burner ports properly
This was the simplest fix, yet it had the biggest impact.
Over time, grease, food particles, and dust clog the tiny holes in the burner. When that happens, gas can’t flow evenly, which leads to uneven flames or difficulty igniting.
I used to wipe the stove surface regularly, thinking that was enough. It wasn’t. The real buildup happens inside the burner head.
Here’s what changed everything for me:
First, I removed the burner caps and heads. Most stoves allow you to lift them off easily. Underneath, I found debris I hadn’t noticed before—tiny crumbs and sticky residue.
Instead of rushing, I soaked the parts in warm water mixed with mild detergent. After about 15–20 minutes, I used a soft brush (an old toothbrush works well) to clean each port gently. For stubborn clogs, a thin pin helped clear the holes.
The difference after reassembling was immediate. The flame was even, strong, and steady. No more sputtering or delayed ignition.
What I learned here is simple: surface cleaning isn’t enough. Deep cleaning the burners every few weeks prevents most common issues.
fix two: aligning the burner cap correctly
This might sound too basic, but it’s something I overlooked for a long time.
After cleaning, I would place the burner cap back without paying attention to alignment. If the cap isn’t seated properly, gas flow becomes uneven. This causes irregular flames or even prevents ignition entirely.
The first time I realized this, I had spent nearly an hour trying to figure out why a burner wouldn’t light. The issue wasn’t dirt. It was the cap sitting slightly off-center.
Now, every time I reassemble the stove, I take a moment to ensure each cap sits flat and snug. You can usually feel it settle into place. If it wobbles, it’s not aligned correctly.
This tiny adjustment saved me from unnecessary stress and confusion. It’s one of those details that seems insignificant until you see how much it affects performance.
fix three: checking and securing the gas connection
Gas connections can loosen over time, especially if the stove is moved for cleaning or rearranging.
I used to ignore the hose and regulator completely. As long as the stove worked, I assumed everything was fine. That changed the day I noticed a faint gas smell even when the burners were off.
It wasn’t strong, but it was enough to make me uneasy.
After turning off the gas supply, I inspected the connection. The hose wasn’t damaged, but the fitting wasn’t as tight as it should have been. I carefully secured it, ensuring it was snug but not overly tightened.
To be safe, I applied a simple soap solution around the connection and turned the gas on briefly. No bubbles formed, which meant there was no leak.
This step gave me peace of mind. It’s not something you need to do daily, but checking connections periodically is essential for safety.
fix four: cleaning or replacing the ignition system
The clicking sound of the igniter became one of my biggest frustrations. Sometimes it worked instantly. Other times, it kept clicking without lighting the flame.
The problem turned out to be dirt and moisture around the ignition electrode.
I gently cleaned the electrode with a dry cloth and made sure it was completely dry. Moisture, even a small amount, can interfere with the spark.
In cases where cleaning didn’t help, I learned that ignition parts can wear out over time. Replacing them isn’t as complicated as it sounds, but it’s important to follow proper guidance or seek help if unsure.
After cleaning, the ignition became consistent again. No more repeated clicking, no more delays.
This fix taught me that not every problem requires replacement. Sometimes, careful cleaning is enough.
fix five: adjusting the air-to-gas mixture
This was the most technical fix I attempted, but also one of the most rewarding.
A proper flame should be blue and steady. If it’s yellow or produces soot, the air-to-gas ratio is off. This not only affects cooking efficiency but can also lead to carbon buildup on cookware.
I discovered that many stoves have an adjustable air shutter near the burner or gas inlet. By slightly adjusting it, you can control how much air mixes with the gas.
I approached this carefully. After locating the adjustment point, I made small changes and observed the flame each time. Gradually, the yellow tips disappeared, replaced by a clean blue flame.
The improvement was noticeable. Cooking became faster, and my pots stayed cleaner.
This fix requires patience and attention, but it’s worth the effort. It’s also a reminder that even small adjustments can have a big impact.
building habits that keep your stove working
Fixing problems is one thing. Preventing them is another.
After going through these repairs, I developed a few habits that now feel natural. I clean the burners regularly, not just the surface. I check alignment every time I reassemble parts. I stay aware of how the stove sounds and smells.
These habits don’t take much time, but they prevent most issues before they start.
I also learned to respect the role of safety. Gas appliances are reliable, but they require attention. If something feels off and you can’t identify the cause, it’s always better to consult a professional.
the unexpected benefits of learning basic repairs
What surprised me the most wasn’t just the improved performance of my stove. It was the confidence that came with understanding it.
Before, every small issue felt like a big problem. Now, I approach things differently. I observe, I troubleshoot, and I fix what I can.
This shift goes beyond the kitchen. It changes how you handle everyday challenges. You become less dependent, more aware, and more capable.
There’s also a certain satisfaction in fixing something yourself. It’s not just about saving money. It’s about knowing you can solve problems with your own hands.
a kitchen that feels different now
Today, my kitchen feels calm. The stove lights instantly. The flames are steady. Cooking is smooth and predictable.
It’s not because I bought a new appliance. It’s because I learned how to take care of the one I already had.
These five fixes didn’t require special tools or advanced skills. They required attention, patience, and a willingness to learn.
If you’re dealing with a gas stove that’s not performing the way it should, start small. Look closely. Clean thoroughly. Adjust carefully.
You might be surprised at how much you can fix on your own.
frequently asked questions
- how often should I clean my gas stove burners
It’s a good idea to clean the burners lightly every week and do a deeper cleaning once every 3–4 weeks, depending on how often you cook. - why is my gas stove flame yellow instead of blue
A yellow flame usually indicates an improper air-to-gas mixture or clogged burner ports. Cleaning the burner and adjusting airflow often solves the issue. - is it safe to check gas leaks myself
You can perform a basic check using a soap solution on connections. If bubbles form, there may be a leak. However, for anything serious or uncertain, always contact a professional. - what should I do if the igniter keeps clicking
First, clean and dry the ignition area. If the problem continues, the ignition switch or electrode may need replacement. - can I repair my gas stove without professional help
Many basic issues like cleaning burners, aligning caps, and checking connections can be handled safely. For complex problems involving internal components, it’s best to seek expert assistance. - how do I know if my gas stove needs replacement instead of repair
If the stove has multiple recurring issues, significant damage, or safety concerns that repairs can’t resolve, it may be time to consider a replacement.
In the end, maintaining a gas stove isn’t about mastering complicated techniques. It’s about understanding the basics and paying attention to details. Once you do that, everything else becomes easier—and your kitchen becomes a place you enjoy being in again.