

5 Essential Gas Stove Repair Basics Installation Mistakes to Avoid
There is something quietly satisfying about a gas stove that works exactly the way it should. The soft click of ignition, the steady blue flame, the immediate heat—it all feels dependable. But that reliability is fragile when installation mistakes creep in unnoticed. Most gas stove problems don’t begin with wear and tear; they start with small oversights during installation or early repairs. What makes these mistakes frustrating is that they are often avoidable.
This guide is not just a checklist. It’s a deeper look into the habits, assumptions, and overlooked details that lead to gas stove issues. If you are a beginner, a homeowner trying DIY fixes, or someone who simply wants to understand what goes on behind the burners, this will give you a practical foundation.
mistake 1: ignoring proper gas connection sealing
A gas stove is only as safe as its connections. The point where the stove meets the gas supply line is often underestimated, especially during first-time installations. People tend to assume that tightening a connector is enough, but sealing is a different matter altogether.
Gas leaks don’t always announce themselves dramatically. Sometimes they are subtle, with a faint smell that is easy to ignore. Other times, the leak is so small that it only becomes noticeable when performance starts dropping—uneven flames, delayed ignition, or a slight hissing sound.
What actually goes wrong here is usually the absence or misuse of sealing materials. Thread seal tape or pipe sealant is often either applied incorrectly or skipped entirely. Even worse, some people reuse old connectors without inspecting them for cracks or wear.
A proper connection involves more than tightening. It means cleaning the threads, applying sealant evenly, and ensuring that the connector sits flush without strain. After installation, a simple soap solution test can reveal leaks immediately. Bubbles forming at the joint are a clear sign that something is wrong.
Skipping this step might save a few minutes, but it risks long-term inefficiency and safety hazards.
A quick field note:
If you ever smell gas after installation, do not attempt to “fix it later.” Turn off the supply immediately and ventilate the area. Gas safety is not something to negotiate with.
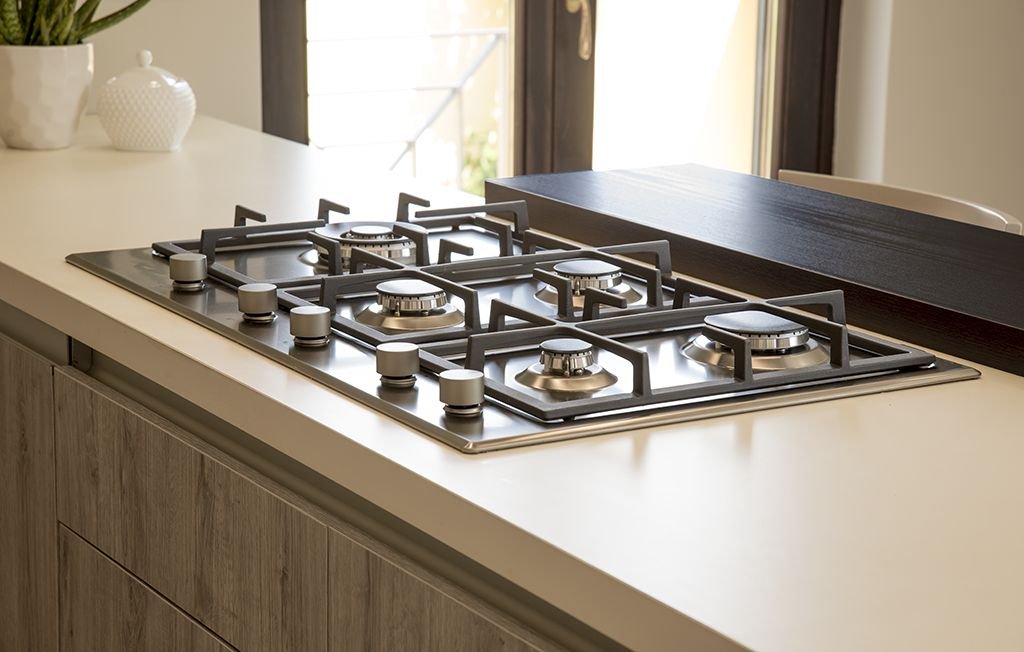
mistake 2: poor burner alignment and assembly
At first glance, placing burners on a stove seems almost too simple to get wrong. But this is one of the most common installation errors. Burners that are slightly misaligned can disrupt the entire cooking experience.
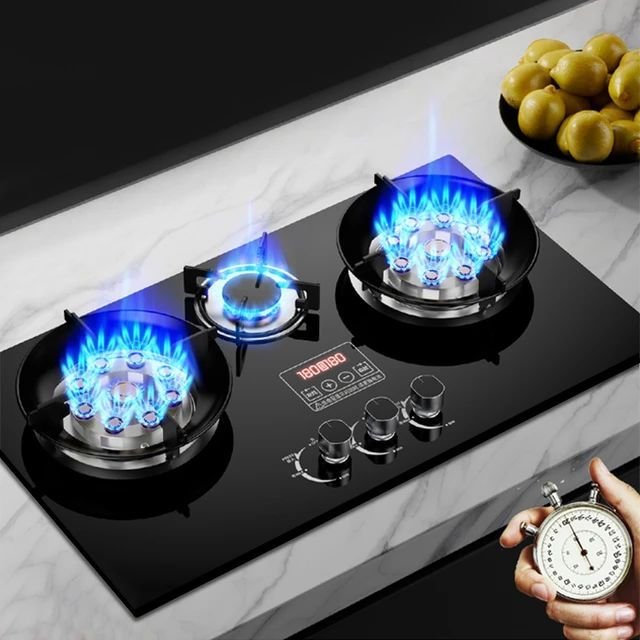
When burners are not seated correctly, the gas flow becomes uneven. This leads to flames that flicker, burn yellow instead of blue, or fail to distribute heat properly. Over time, this can damage cookware and increase fuel consumption.
The issue often arises during cleaning or initial setup. People remove burner caps and rings but fail to place them back in their exact position. Even a slight tilt can interfere with the gas-air mixture needed for efficient combustion.
To avoid this, take a moment to understand how your burner components fit together. Most burners have grooves or alignment marks. These are not decorative—they ensure proper positioning. After placing the burner, give it a gentle twist or press to confirm it sits securely.
Another overlooked detail is debris. Dust, grease, or food particles trapped under the burner can prevent proper seating. A quick wipe before reassembly can make a significant difference.
Think of burners as precision parts rather than loose accessories. When they sit correctly, everything else falls into place.
mistake 3: neglecting ventilation and airflow requirements
Gas stoves do not operate in isolation. They rely on proper airflow to burn fuel efficiently. Unfortunately, ventilation is often treated as an afterthought.
In many kitchens, especially smaller ones, stoves are installed in tight corners with little regard for air circulation. Windows remain closed, exhaust fans are rarely used, and range hoods—if present—are underutilized.
The result is incomplete combustion. This can produce soot, yellow flames, and even harmful gases like carbon monoxide. While modern stoves are designed to minimize risks, poor ventilation can still create unsafe conditions.
From a performance standpoint, lack of airflow reduces flame efficiency. You may notice longer cooking times or uneven heating. These are not just inconveniences—they are signs that the stove is struggling to function properly.
Proper installation includes ensuring that there is enough space around the stove for air to circulate. If your kitchen allows, position the stove near a window or ensure that an exhaust system is functional.
A simple habit can make a big difference: turn on the exhaust fan every time you cook. It not only improves air quality but also supports better combustion.
mistake 4: incorrect leveling of the stove
Leveling might sound like a minor detail, but it has a direct impact on both safety and cooking performance. A stove that is even slightly tilted can cause uneven flame distribution and unstable cookware.
This mistake often happens because people rely on visual judgment instead of using a level tool. Floors are rarely perfectly flat, and even a small slope can affect the stove’s position.
An unlevel stove creates multiple issues. Pots and pans may slide or tilt, leading to uneven cooking. Liquids can gather on one side, affecting recipes that require precise heat distribution. More importantly, the flame may not contact the cookware evenly, reducing efficiency.
Most gas stoves come with adjustable legs. These are designed specifically to address this issue. During installation, place a level tool across the stove surface and adjust the legs until the bubble is centered.
It’s a simple step that takes only a few minutes but significantly improves usability. Once the stove is level, cooking becomes more predictable and safe.
mistake 5: overlooking ignition system checks
Modern gas stoves often come with automatic ignition systems. These systems rely on electrical components to create a spark that lights the gas. While convenient, they are also prone to installation-related issues.
One common mistake is assuming that the ignition system will work without testing. After installation, people turn on the gas and expect everything to function perfectly. When it doesn’t, they blame the stove rather than the setup.
Ignition problems can stem from loose connections, misaligned electrodes, or moisture in the system. During installation, it’s important to check that all electrical connections are secure and that the ignition points are clean and properly positioned.
A quick test involves turning each burner knob and observing the spark. It should be consistent and immediate. If there is a delay or no spark at all, something needs adjustment.
Another detail often missed is grounding. Improper grounding can interfere with the ignition system, leading to inconsistent performance.
Taking the time to test and fine-tune the ignition system ensures that your stove operates smoothly from the start.
bringing it all together
These five mistakes share a common theme: they are small details that are easy to overlook. Yet each one has the potential to affect safety, efficiency, and overall performance.
Gas stove installation is not just about connecting parts. It is about understanding how those parts interact. A properly installed stove feels effortless—it lights quickly, burns cleanly, and cooks evenly. Achieving that level of reliability requires attention to detail.
If you are handling installation yourself, approach it with patience. Read the manual, double-check connections, and don’t rush through the process. If something feels uncertain, it’s better to pause and seek guidance than to proceed with guesswork.
practical checklist for beginners
Before you consider your installation complete, run through this quick checklist:
- Are all gas connections sealed and tested for leaks?
- Are burners clean, aligned, and properly seated?
- Is there adequate ventilation in the kitchen?
- Is the stove level on all sides?
- Does the ignition system spark consistently on every burner?
This checklist is not exhaustive, but it covers the basics that prevent most common issues.
a note on safety and confidence
Working with gas appliances can feel intimidating, and that’s a healthy mindset to have. A bit of caution goes a long way. At the same time, understanding the basics builds confidence.
The goal is not to turn you into an expert overnight. It is to help you recognize potential problems before they escalate. When you know what to look for, you become more aware, more careful, and ultimately more capable.
FAQs
- how can i tell if my gas stove connection is leaking?
A simple method is the soap solution test. Mix water with a little dish soap and apply it to the connection points. If bubbles form, there is a leak that needs immediate attention. - why is my gas stove flame yellow instead of blue?
A yellow flame usually indicates incomplete combustion. This can be caused by poor ventilation, dirty burners, or improper alignment. Cleaning and adjusting the burners often resolves the issue. - do i really need to level my gas stove?
Yes, leveling is essential. An unlevel stove can lead to uneven cooking and unstable cookware. Using a leveling tool ensures better performance and safety. - what should i do if the ignition system is not working?
Check for loose electrical connections, clean the ignition electrodes, and ensure the stove is properly grounded. If the problem persists, professional assistance may be needed. - is it safe to install a gas stove by myself?
It can be safe if you follow proper guidelines and take necessary precautions. However, if you are unsure about any step, it is always best to consult a professional. - how often should i check my gas stove for issues?
A quick inspection every few months is a good practice. Look for signs of wear, clean the burners, and test the connections to ensure everything is functioning properly.
In the end, a well-installed gas stove is not just about convenience—it is about peace of mind. When you avoid these common mistakes, you create a safer and more efficient cooking environment that lasts for years.