

Let me be honest with you — I ignored my gas stove for almost two years. Wiped the surface down occasionally, sure, but actual maintenance? Nope. Until one evening, mid-cooking, the igniter started clicking like a broken toy and the flame on my back burner looked more like a candle than a cooking flame. That’s when I realized I’d been taking this appliance for granted.
After some trial and error (and one embarrassing call to a technician who charged me just to clean a clogged burner cap), I finally figured out what actually keeps a gas stove running well. These aren’t complicated steps. You don’t need a toolbox or a YouTube rabbit hole. Just some consistency and a little know-how.
Here’s what’s worked for me — and what I’ve seen work for others too.
1. Clean the Burner Caps and Heads More Often Than You Think You Need To
This was my biggest mistake. I thought cleaning meant wiping the grates. It doesn’t.
The burner cap — that small disc sitting on top of the burner — is where most problems start. Food particles, grease, and boiled-over liquids get trapped in the tiny slots around the cap. When those slots get blocked, gas can’t flow evenly, and you end up with a weak or uneven flame.
What I do now:
- Remove the burner caps and grates every two weeks (more often if I’ve been cooking heavy meals)
- Soak them in warm soapy water for 15–20 minutes
- Use an old toothbrush to scrub the slots gently
- Dry them completely before putting them back — this part matters more than most people think
A wet burner cap sitting on the igniter is a recipe for that annoying clicking sound that won’t stop. Always dry everything with a cloth and let it air out for a bit before reassembly.
2. Check Your Igniter Electrodes Regularly
The igniter electrode is that small ceramic tip you see near each burner. It’s what creates the spark. And it’s surprisingly easy to damage or dirty without realizing it.
I once knocked mine slightly out of position while scrubbing aggressively. It kept clicking but wouldn’t light — classic sign the electrode isn’t positioned correctly or is dirty.
What to check:
- Look for any white residue or food buildup on the electrode tip
- Use a dry toothbrush or a cotton swab lightly dampened with rubbing alcohol to clean it
- Make sure it’s not bent or cracked — if the ceramic is cracked, it needs replacement
- The tip should be about 3–4mm away from the burner cap for optimal spark
One thing I learned from a gas stove repair guide on ignition problems is that a lot of ignition failures aren’t actually electrical problems — they’re just dirty or misaligned electrodes. Such a simple fix once you know what to look for.
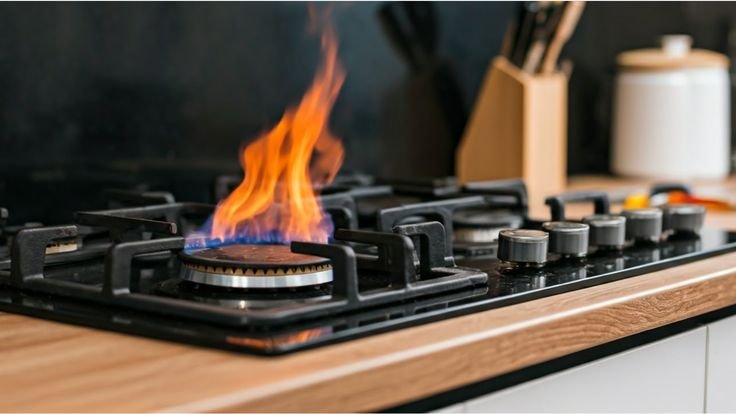
3. Never Underestimate What a Weak Flame Is Trying to Tell You
A weak flame isn’t just an annoyance. It’s your stove communicating that something’s off.
I remember cooking rice and wondering why it was taking forever. The flame looked fine at a glance — but it was way smaller than usual and slightly orange instead of blue. That orange tint is a sign of incomplete combustion, often caused by a blocked burner or improper air-to-gas ratio.
Common causes of weak or uneven flame:
| Problem | Likely Cause | Quick Fix |
|---|---|---|
| Yellow/orange flame | Blocked air holes or burner ports | Clean burner cap and head |
| Flame only on one side | Partially clogged burner slots | Soak and scrub the burner head |
| Low flame even on high setting | Gas pressure issue or partially closed valve | Check valve; call a technician if persists |
| Flame goes out by itself | Thermocouple issue or draft | Check kitchen ventilation; inspect thermocouple |
Most of the time, cleaning the burner head resolves the uneven flame issue. But if you’ve cleaned everything and the flame is still weak, it’s worth checking if the gas supply valve under the stove is fully open.
4. Keep the Area Around the Burner Dry at All Times
Water and gas stove components are enemies. I can’t stress this enough.
After washing the grates, I used to just plop them back on while they were still slightly damp. Bad idea. The moisture would mess with the igniter, cause corrosion over time, and create that endless clicking sound we all hate.
My current routine:
- After washing, wipe all components with a dry cloth
- Let them air dry on the counter for 20–30 minutes
- Before turning on the stove, make sure there’s no standing water anywhere near the burners
- If you’ve had a major spill, dry the area immediately instead of just wiping the surface
Also — avoid using excessive water when cleaning the stove top itself. A slightly damp cloth is enough. You don’t want water seeping into the burner openings or around the igniter.
5. Inspect the Gas Hose and Connections Every Few Months
This one doesn’t require any tools — just your nose and eyes.
The gas hose connecting your stove to the wall supply can develop small cracks or loose connections over time. This is obviously a safety issue, not just a performance one.
Every 3 months, I do a quick visual check:
- Look at the hose for any visible cracks, kinks, or discoloration
- Smell around the connection points — any sulfur or rotten egg smell means call your gas company immediately
- Check that the connection at the wall and at the stove is secure (hand-tight is enough; don’t over-tighten)
For a more reliable check, you can apply a small amount of soapy water to the connection joints with a brush. If bubbles form, there’s a gas leak — and that means no open flames, open windows, and get professional help right away.
You can also cross-reference with a safety checklist before any repair to make sure you’re covering all bases — especially if you’re doing any DIY work on the stove.
6. Don’t Ignore the Thermocouple (Especially on Older Stoves)
If you have a gas stove with a pilot light system (common in older models), the thermocouple is a critical safety device. It detects whether the pilot flame is lit and shuts off gas flow if it’s not — preventing gas from filling your kitchen undetected.
When the thermocouple gets dirty or goes faulty, the burner lights but immediately goes out when you release the knob. This used to confuse me completely — I thought the gas was the issue.
Signs your thermocouple needs attention:
- Burner lights but won’t stay lit without holding the knob down
- Pilot light keeps going out on its own
- You can see the thermocouple tip is sooty or discolored
Cleaning it is straightforward — use fine steel wool or sandpaper to gently rub the tip until it’s clean and shiny. If it still doesn’t work after cleaning, thermocouple replacement is inexpensive (usually under $20) and doable without a technician.
7. Build a Simple Monthly Maintenance Habit — Takes 15 Minutes
All of the above sounds like a lot, but it doesn’t need to be. The reason my stove got into such bad shape was because I waited until something broke. Now I do a quick 15-minute check once a month, and it’s made a massive difference.
Here’s a simple monthly maintenance checklist you can follow:
Monthly Gas Stove Maintenance Checklist
| Task | Time Needed | Tools Required |
|---|---|---|
| Remove and clean burner caps | 5 minutes | Soapy water, toothbrush |
| Clean igniter electrodes | 2 minutes | Cotton swab, rubbing alcohol |
| Check flame color and strength | 1 minute | None |
| Inspect gas hose and connections | 2 minutes | None (or soapy water) |
| Wipe down burner heads and grates | 3 minutes | Damp cloth |
| Check that all knobs turn smoothly | 1 minute | None |
| Dry everything completely | 1 minute | Dry cloth |
That’s it. Fifteen minutes a month can prevent 90% of the common problems people call technicians for. I know because I was that person calling a technician for a clogged burner cap.
For more in-depth maintenance strategies, I found this guide on gas stove maintenance habits that extend stove life particularly useful when I was building my own routine.
Common Mistakes People Make (Including Me)
Let me save you some headaches:
Using too much water when cleaning — gets into igniter housings and causes clicking that won’t stop. Use damp, not wet.
Reassembling while parts are still wet — always dry fully before putting the stove back together.
Ignoring the orange or yellow flame — it’s not just cosmetic. It’s a combustion efficiency issue that wastes gas and can produce carbon monoxide.
Tightening gas connections too hard — this can crack fittings. Hand-tight is enough.
Using harsh chemicals on burner parts — bleach or abrasive cleaners can damage the surface and corrode metal components. Stick to dish soap and warm water.
Skipping the drying step after a big spill cleanup — moisture lingers longer than you think, especially in tight burner housings.
One More Thing Worth Knowing
If you’ve done all of this and your stove still isn’t behaving — weak flames, ignition failures, gas smell — don’t keep troubleshooting on your own. There’s a point where a professional check is genuinely the safer and smarter option. Gas appliances done wrong aren’t a minor inconvenience; they’re a real hazard.
But the good news is that if you stay consistent with these habits, you probably won’t need a technician more than once every few years for anything major.
A clean, well-maintained gas stove runs better, uses fuel more efficiently, and honestly just makes cooking more enjoyable. You’re not fighting with igniters or waiting twice as long for water to boil.
Also worth reading: If your burner clicks constantly but won’t light, this breakdown of smart solutions for clicking igniters covers exactly what causes it and how to fix it without calling anyone.