

I still remember the day I moved into my first apartment and confidently declared, “I’ll cook everything from scratch.” Big dreams. The problem? I had never actually set up or operated a gas stove on my own before. My mom always handled it back home, and I just… watched. Or didn’t watch, honestly.
The first week was a disaster. One burner wouldn’t light. Another one kept clicking nonstop even after the flame was on. I had no idea what I was doing, and I was too stubborn to call a technician over what felt like a “simple” thing.
So I figured it out the hard way — through trial, error, some minor panic, and a lot of YouTube rabbit holes at midnight. Here’s everything I wish someone had told me before I started.
1. Read the Manual Before You Touch Anything
I know, I know. Nobody reads manuals. I didn’t either — and that cost me about three days of unnecessary confusion.
My stove had a specific sequence for lighting the burners. I was doing it completely wrong, which is why the igniter kept clicking but the flame refused to show up. Turns out, you’re supposed to press the knob in before turning it, hold it down for a few seconds after the flame appears (to heat the thermocouple), and then let go slowly.
I was just turning the knob like a regular dial. No press, no hold. Every single time.
The manual also explained the burner cap positions, the gas pressure settings, and which burner was designed for which kind of cooking. None of that is obvious just by looking at the stove.
What I’d tell you: Spend 20 minutes with the manual before your first use. Even if your stove is a used one without a manual, search the model number online. Manufacturers usually have PDFs available for free.
2. The Burner Cap Has to Sit Perfectly — No, Seriously
This one caught me off guard completely.
After cleaning my stove for the first time (I was pretty proud of myself for doing it so early), I put everything back together and noticed one burner was producing a weak, uneven flame. It looked like a half-moon instead of a clean circle.
I checked for blockages, cleaned the ports again, checked the gas line — nothing seemed wrong. Spent probably an hour on this.
The answer? The burner cap was slightly off-center. Like, barely tilted. Maybe 2–3 millimeters off from where it should sit.
That tiny misalignment completely disrupted the gas flow pattern. Once I seated it properly (there’s usually a small notch or flat edge that aligns it correctly), the flame went back to being perfectly even and blue.
This is actually a super common issue, and if you’re dealing with a weak or uneven flame, checking the gas stove repair basics steps to fix weak flame guide helped me understand exactly what to look for. The burner cap alignment is almost always the first thing to check.
What I’d tell you: After every cleaning session, take an extra 30 seconds to make sure every burner cap is properly seated and level. Give it a gentle wiggle to confirm it’s not loose.

3. Ignition Problems Are Usually About Moisture or Debris (Not the Gas)
Week two, my front-left burner decided it just wasn’t going to light anymore. It would click, I’d smell a faint hint of gas, but no flame.
My first assumption was a gas supply issue. I checked the valve, checked if other burners worked (they did), and started googling whether I had a faulty regulator. I was spiraling.
Turns out, the issue was embarrassingly simple: I had boiled over some pasta the night before, and the liquid had seeped down into the igniter area. The moisture was preventing the spark from igniting the gas properly.
Here’s a quick breakdown of what I did to fix it:
| Problem | Likely Cause | Fix |
|---|---|---|
| Clicking but no flame | Moisture in igniter | Dry with cloth + low heat from oven |
| Weak flame | Clogged burner ports | Clean with thin wire or toothpick |
| Uneven flame | Misaligned burner cap | Reseat the cap correctly |
| No clicking at all | Food debris on electrode | Clean electrode tip gently |
| Flame goes out immediately | Thermocouple issue | Hold knob longer after lighting |
I let the burner area dry out overnight and used a hairdryer on low setting to speed it up. Next morning — worked perfectly.
If you’re dealing with similar ignition headaches, this breakdown of gas stove repair basics ideas to fix ignition problems covers the exact steps in more detail than I could figure out on my own.
What I’d tell you: Before assuming it’s a mechanical or gas issue, always check for moisture and debris first. It’s the most common cause of ignition failure, and it’s totally fixable without any tools.
4. Ventilation Is Not Optional — Even If You Think It Is
Okay, this one I’m slightly embarrassed to admit.
My kitchen window was stuck shut for about the first two weeks (old apartment, warped frame). I figured, “It’s fine. People cook in closed kitchens all the time. It’s just one window.”
By the end of day one of serious cooking, I had a low-grade headache. By day three, I felt sluggish and mildly dizzy after cooking sessions. I thought I was just tired from the move.
A friend came over, walked into my kitchen while I was cooking, and immediately said, “Why is it so stuffy in here? You should open something.”
I got the window unstuck that same evening.
Here’s the thing about gas stoves — they consume oxygen and release combustion byproducts including carbon monoxide and water vapor. Even a properly functioning stove needs airflow. An improperly adjusted one can release even more byproducts.
Basic ventilation setup I’d recommend:
- Always have at least one window cracked while cooking
- Use an exhaust fan or range hood if your kitchen has one
- Never run multiple burners for extended periods in a fully sealed room
- Consider a basic carbon monoxide detector near the kitchen — they’re inexpensive and worth every penny
This isn’t about being paranoid. It’s just how gas appliances work. The gas stove repair basics safety tips that prevent gas leaks article also covers some related points about kitchen safety that I found genuinely useful once I started paying more attention to this stuff.
What I’d tell you: Don’t underestimate ventilation. It’s not just about smells or steam — it’s about air quality that directly affects how you feel.
5. Cleaning Has to Be a Habit, Not a Crisis Response
My cleaning approach for the first month: wipe things down when they look visibly dirty. Seemed logical.
The result: hardened grease and food residue that had baked itself onto the burner grates, the burner caps, and around the igniters. Getting that stuff off took me the better part of a Saturday afternoon with baking soda paste, vinegar spray, and more elbow grease than I’d like to admit.
Compare that to what I do now: quick wipe after every cooking session (takes maybe 3 minutes), deeper clean of the grates and caps once a week (maybe 15 minutes), full cleaning of the whole stove surface every two weeks.
Night and day difference. The stove looks better, the burners perform more consistently, and I’ve had zero repeat ignition issues since I started this routine.
Simple weekly cleaning checklist:
- ✅ Remove grates and wipe down with warm soapy water
- ✅ Remove burner caps, check for clogged ports, rinse clean
- ✅ Wipe around igniter electrode with dry cloth (not wet)
- ✅ Clean stove surface with non-abrasive cleaner
- ✅ Check drip pans if your model has them
The first time is always the hardest because you’re dealing with buildup. After that, regular maintenance is genuinely easy and fast.
What I’d tell you: Treat cleaning like brushing your teeth — short, consistent, non-negotiable. Waiting until things look bad means you’re already behind.
6. Know When to Stop DIY-ing and Call Someone
This is probably the most important lesson, and the one I almost ignored.
About six weeks in, I noticed a faint smell of gas near the back of the stove. Not strong, not alarming — just faint. And intermittent. I convinced myself it was probably just residue burning off or something I’d cooked nearby.
A week later, the smell was still there. I finally looked it up and found that even a faint, intermittent gas smell should be taken seriously. I called the gas company for a safety check — they have free leak detection services in most areas.
The technician found a very minor connection point near the regulator that had developed a slight looseness. Nothing catastrophic, but definitely something that needed fixing. He tightened it, checked everything else, gave the whole setup a clean bill of health.
The thing is, some problems are genuinely DIY-friendly. Clogged burner ports, misaligned caps, moisture in the igniter, dirty electrodes — all of that is safe to handle yourself with basic knowledge. But anything that involves the actual gas line, connections, or regulator is a different category entirely.
DIY vs. Call a Pro — Simple Breakdown:
| Issue | DIY Safe? |
|---|---|
| Burner not lighting (moisture/debris) | ✅ Yes |
| Uneven or weak flame (clogged ports) | ✅ Yes |
| Burner cap misaligned | ✅ Yes |
| Clicking igniter not stopping | ✅ Yes (usually moisture) |
| Faint smell of gas | ❌ No — call immediately |
| Visible damage to gas line | ❌ No — call immediately |
| Regulator or valve issues | ❌ No — licensed tech only |
| Stove not receiving gas at all | ❌ No — verify supply first, then call |
There’s no shame in calling a professional for things outside your lane. That’s not admitting defeat — that’s being smart about safety.
A Few Things Nobody Warned Me About (Bonus Observations)
Since I went through all of this, here are a few smaller things that didn’t fit neatly into the lessons above but are still worth knowing:
The “continuous clicking” issue is almost always fixable at home. If your stove keeps clicking after the flame is lit, it’s usually moisture or food debris on the igniter electrode. Dry it out, clean it gently, and it stops. Drove me absolutely crazy for two days before I figured this out.
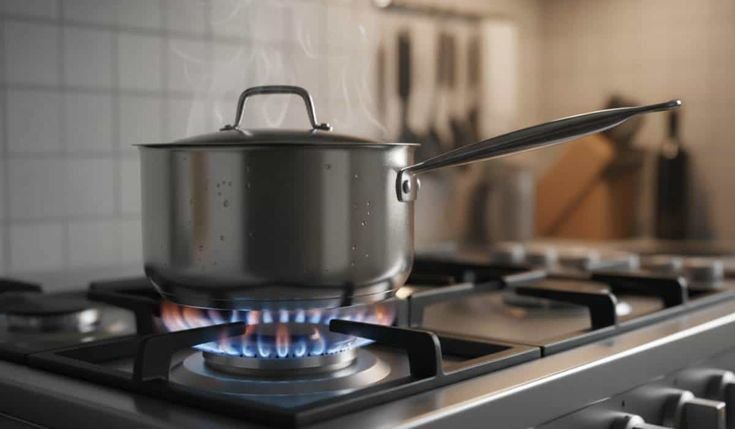
Blue flame is what you want. Yellow or orange flames indicate incomplete combustion — usually from dirty burner ports or a slightly off air-to-gas ratio. Clean the ports first. If the flame stays yellow after cleaning, have someone look at the air shutter adjustment.
First-time setup smells are normal. When you use a brand-new stove for the first time, there’s often a burning smell or slight smoke from manufacturing oils and coatings burning off. Run the burners on low for 15–20 minutes in a ventilated kitchen before your first actual cooking session. Gets rid of it.
Don’t use abrasive scrubbers on burner caps. They scratch the surface and can affect how evenly the flame distributes. Soft cloths and soaking work better anyway.
Looking back, none of this was actually complicated. It was just unfamiliar. The stove itself is a pretty logical piece of equipment once you understand how the parts work together — the gas flow, the ignition, the flame distribution, the ventilation. Everything connects.
The hard part is that most of us come to this stuff cold, with no background and no one to ask. So we learn by messing up, which isn’t the worst way to learn — just a slightly stressful one.
If you’re setting up your first gas stove or troubleshooting one that’s been giving you grief, a solid starting point is going through the gas stove repair basics troubleshooting steps anyone can try — it covers a lot of common scenarios in plain language and helped me get my head around the process when I was still very much figuring things out.
Take it one issue at a time. You’ll get there.